Upload a custom Python program using a Dockerfile
Objective
This tutorial will explain how to create a Docker image containing two custom Python programs, using a Dockerfile to build the image. You will then learn how to push the image to the Seven Bridges image registry.
The scripts used in the tutorial are:
transcribe.py- Gets an input DNA file composed of nucleotides and transcribes it into RNA. The output file produced by the program isrna.txt.translate.py- Takes mRNA as input and translates it into a peptide. The output file produced by the program ispeptide.txt.
Learn more about Dockerfiles.
Prerequisites
xFor this tutorial, you will need:
- An account on CAVATICA.
- One of the following machines:
- A Linux computer with Docker installed on it. Full installation instructions are available here.
- A Mac with Docker Machine installed on it. Full installation instructions are available here.
- A Windows with either Docker for Windows or Docker toolbox depending on the Windows version. Full installation instructions are available here.
1. Create a project on CAVATICA
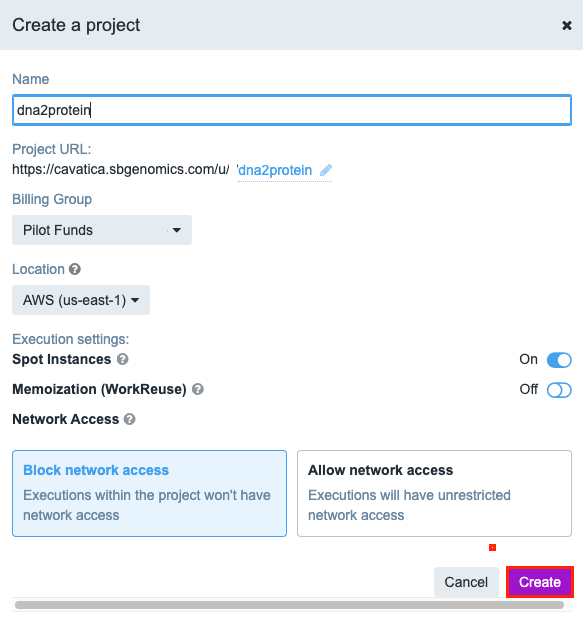
To create a project:
- Click Projects in the top navigation bar and choose Create a project.
- Name the project dna2protein.

- Click Create.
You have now created the new project.
2. Build the image
You will first need to download the package containing the programs and the Dockerfile, and then create a Docker image called dna2protein containing the programs.
To do this:
- Click here to download the archive containing the programs and the Dockerfile.
- Open up a terminal.
Depending on your operating system, first make sure that Docker is started:
- Docker on Mac OS 10.10.3 Yosemite or newer run Docker for Mac and start a terminal of your choice.
- Docker on Mac OS 10.8 Mountain Lion or newer run Docker Machine, by opening Docker Quickstart terminal or by using the command docker-machine start default.
- Windows 7 or 8: run Docker Quickstart Terminal.
- Windows 10: run Docker for Windows and start a terminal of your choice.
- Linux: skip this step.
- Use the
cdcommand to navigate to the folder where the downloaded archive is located, for example:
cd /home/rfranklin/Downloads- Unzip the downloaded file by typing:
unzip dna2protein-tutorial.zip -d ../dna2protein- Navigate to the folder containing the programs and the Dockerfile:
cd ../dna2protein/dna2protein-tutorialYou are now ready to build the image.
- Build the image from the Dockerfile:
docker build -t dna2protein .The image is built based on the instructions in the Dockerfile, which is supplied in the downloaded archive.
When the build process is over, you will have a newly created image containing the Python programs.
- To test the programs, enter the following command which will run the image and open the bash terminal inside a container:
docker run -ti dna2protein bashThen display the help messages for the programs:
transcribe.py -hThis command should return:
Translates a DNA input test into a RNA

positional arguments:
  dna            DNA input file to transcribe

optional arguments:
  -h, --help     show this help message and exit
  -v, --verbose
  --version      show program's version number and exit
You can do the same with translate.py:
translate.py -hWhich should return:
Transcribe the provided mRNA into a peptide.

positional arguments:
  mRNA           mRNA to transcribe

optional arguments:
  -h, --help     show this help message and exit
  --verbose, -v  Run in verbose mode (default: False)
  --version      show program's version number and exit
You have now successfully created and tested a Docker image containing the software.
- Enter the following command to leave the container:
exit3. Push the image to the Seven Bridges image registry
As you now need to push the image to the Seven Bridges image registry, you have to specify the repository name for the image, according to the following naming convention: images.sbgenomics.com/<username>/<repository_name>:<tag>. Note that the <username> part needs to be your CAVATICA username, while <repository_name> must be at least 3 characters long and can only contain lowercase letters, numbers, ., - and _. Learn more about repository names in the Seven Bridges image registry.
If you are using the CAVATICA on AWS EU, please useeu-images.sbgenomics.comas the image registry instead ofimages.sbgenomics.com.If you signed up for CAVATICA by explicitly selecting Google Cloud Platform as the cloud service provider, you will need to use Docker Hub to store your images, instead of the Seven Bridges image registry. For detailed instructions on how to push your image(s) to Docker Hub, please refer to the official Docker Hub documentation.
If you signed up for CAVATICA before August 2015, the cloud service provider will be Amazon Web Services US by default.
- Enter the following command to specify the repository name:
docker tag dna2protein images.sbgenomics.com/<user_name>/dna2protein:v0.5.4.devThe repository name also includes the version of the software we are wrapping for use on CAVATICA, which is currently 0.5.4.dev.
- Now you need to log in to the Seven Bridges image registry (images.sbgenomics.com):
docker login images.sbgenomics.com
You should enter your authentication token in response to the password prompt, not your Seven Bridges password.
- Finally, push the image to the Seven Bridges image registry:
docker push images.sbgenomics.com/<user_name>/dna2protein:v0.5.4.dev- Once you are finished, you can explicitly stop your connection to the Seven Bridges image registry (images.sbgenomics.com):
docker logout images.sbgenomics.comOnce the process has been completed, use the Tool Editor to provide a description of the programs on CAVATICA.
Updated 3 months ago
