Overview
CAVATICA allows you to organize your project files in a similar fashion to any other file manager. Files can be organized in folders and subfolders. You can move or copy files between folders or delete both files and folders.
The available actions are different depending on whether a file or a folder has been selected or not. Read below to learn about the available options for organizing files for each of these two options.
When no files or folders are selected
The following actions are available by default, i.e. when no files or folders are selected.

- Search - Enter keywords and use filters to search for specific files or folders.
- Toggle - Click to toggle between regular and folder tree view.
- Files - All of your project files and folders are shown in this space (note: please keep in mind the available options and actions will be different once you select a file or a folder (see below)
- New folder - Click to create a new folder; you can add as many subfolders as you need to create the desired folder structure. The following characters are allowed for naming a folder: a-z, A-Z, 0-9, and special characters (_), (-), and (.). Names can’t be longer than 255 characters.
- Add files - Click to start adding files to your project. The following options are available:
- Public files - Add files from the public files repository (see File repositories on the Platform)
- Projects - Copy files from one of your other projects, see Copy files using the visual interface
- Your Computer - See Upload from your computer
- FTP/HTTP - See Upload from an FTP server
- GA4GH Data Repository Service (DRS) - See Import a DRS file
- Data Tools - Upload files using any of the following options
- Volumes - see Upload from a volume
- Edit metadata with a manifest - see Edit metadata with a manifest
When a file or a folder is selected
The following actions are available by default, i.e. when no files or folders are selected. To select multiple files at once, use shift+click.
Please note that some options are not available when more than one file or a folder is selected.
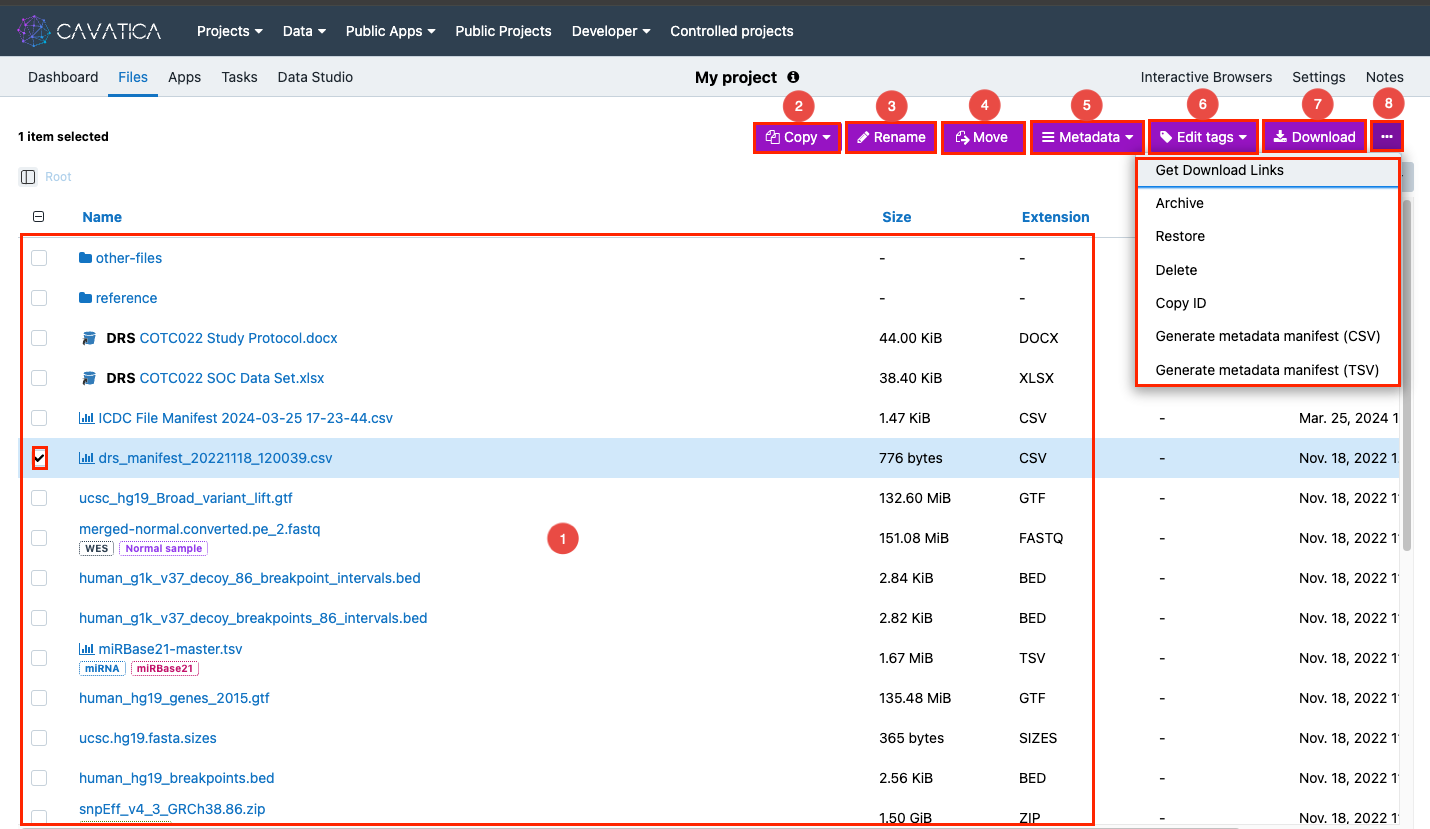
- Files - All available files and folders are shown in this space (note: please keep in mind that available options and actions will be different once you select a file or a folder (see below).
- Copy - Copy selected files or folders to a different folder inside the same or a different project.
- Rename - Select a file and click this option to rename it. Please note:
- folders cannot be renamed
- you can only rename one file at a time
- Move - Move selected files or folders to a different folder inside the same project. Moving folders is not allowed.
- Metadata - Select a file and choose to to either update metadata or clear it.
- Edit tags- Select a file and manage its tags.
- Download - Click to download a file. This option will not be available in case download restriction is set up for the project (see Restrict file downloads).
- Ellipsis menu
- Archive - Learn more about archiving files.
- Restore - Learn more about restoring archived files.
- Delete - Select a folder (or a file), click the ellipsis menu and click Delete to delete it; deleting folders which aren't empty is allowed.
- Copy ID - Allows you to easily obtain the ID of a file or a folder.
Updated 9 months ago