Mount a USB drive in a Docker container
This page is intended to show you how to use files stored on an external USB drive inside the Docker container where the tool you want to use on CAVATICA is installed. During the development process of a tool that will eventually be used on CAVATICA, you might first want develop a Docker image locally, verify its operation on a few realistic test data files, and then upload the validated image to CAVATICA to run at scale.
Since the data files in genomic big data analyses tend to be quite large, it's likely that you will be keeping those files on an external USB storage drive, rather than an internal hard drive on your computer. If you are working locally on an OS X or Windows machine, there are several set up steps that need to be performed before being able to mount a USB drive in a Docker container, while this functionality is supported natively in Linux.
Set up the USB drive mount point on a Linux host
To mount a USB drive in a Docker container on Linux:
- Once you have inserted the USB drive into your computer, enter the following command:
sudo fdisk -l
This will list all available partitions within the system. The name of your device should be similar to e.g. /dev/sdb1.
2. Create the directory which will be used as the mount point for your USB drive:
sudo mkdir /mnt/usb
- Mount the device:
sudo mount /dev/sdb1 /mnt/usb
Once you have completed the previous procedure, follow step 3 in the Docker Toolbox for OS X procedure below.
Set up the USB drive mount point on an OS X host running Docker for Mac
If you are using Docker for Mac on an OS X machine, to prepare the drive for mounting in a Docker container:
- Open the terminal.
- Enter the following command:
mount
This command will display all mounted drives on your machine. Find the identifier that corresponds to your USB drive, for example /dev/disk3s1.
- Unmount the drive:
diskutil unmount /dev/disk3s1
Make sure to replace /dev/disk3s1 with the identifier of your USB drive.
- Create the folder that will serve as the new mount point on OS X:
sudo mkdir -p /mnt/usb
- Mount the USB drive to the newly created mount point.
sudo diskutil mount -mountPoint /mnt/usb /dev/disk3s1
Again, make sure to replace dev/disk3s1 with the identifier of your USB drive.
- Verify that the drive has been properly mounted:
ls /mnt/usb
Before you can mount your USB drive in a Docker container, you need to add the /mnt folder to the list of shared directories in Docker for Mac:
- On the main menu bar click the Docker for Mac icon
 .
. - Select Preferences.
- Open the File Sharing tab.
- Click + in the bottom-left corner of the list.
- Navigate to the
/mntdirectory and click Open. - Click Apply & Restart.
Once you have completed the previous procedure, follow step 3 in the Docker Toolbox procedure below.
Set up the USB drive mount point on an OS X host running Docker Toolbox
If you are using Docker Toolbox on OS X, mounting an external USB drive in a Docker container is a three part process.
1. Add a shared folder to the Oracle VirtualBox Virtual Machine
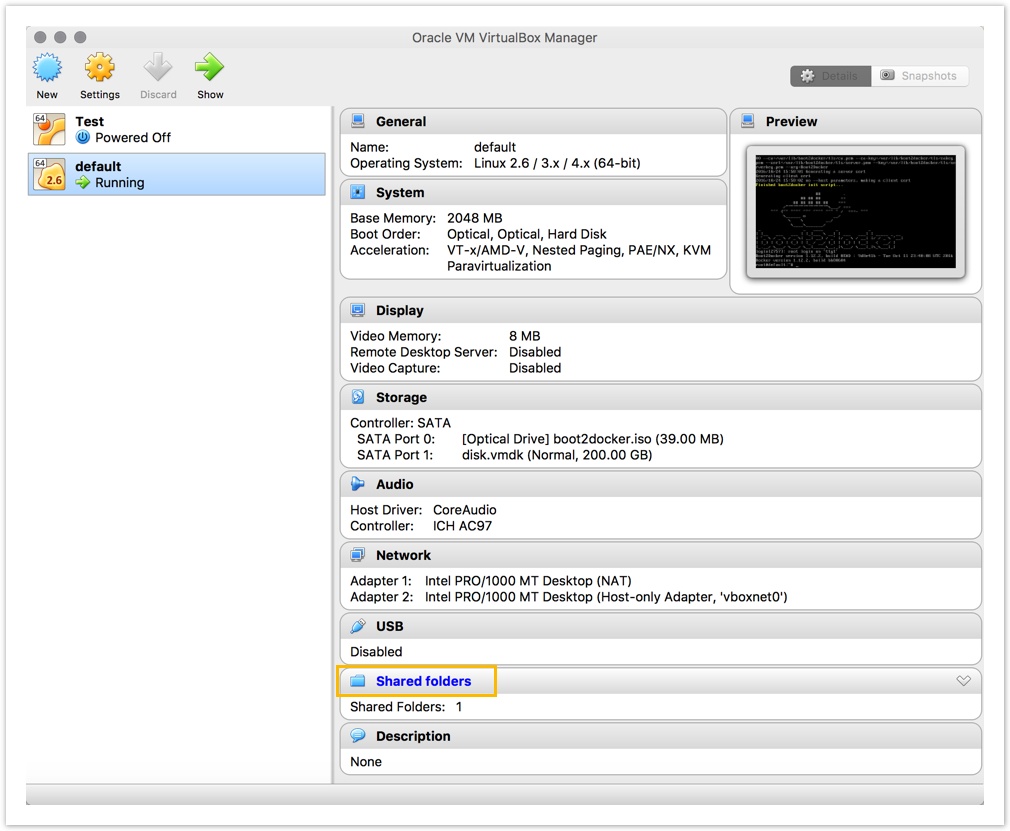
Installing Docker on OS X describes how you can install Docker Toolbox, which also includes Docker Machine and Oracle VirtualBox. To mount a USB hard drive inside a Docker container, the first step is to go back and modify the configuration of this virtual machine by adding a "shared folder". This is done using the VirtualBox GUI manager, in which case the virtual machine does not need to be stopped.
To add a shared folder:
- Insert the USB drive in your computer and make sure it is properly mounted and visible in the operating system.
This step needs to be performed while the virtual machine created by Docker is stopped. To check the status of the virtual machine, enter the following command:\
docker-machine ls
If the state of the machine used by Docker is Running, stop it using the following command:
docker-machine stop default
The machine that is automatically created by Docker is named default. If you have changed the name, make sure to replace default in the command above.
- Start Docker by running the Docker Quickstart Terminal that comes as a part of Docker Toolbox.
- Use Finder to open the VirtualBox Manager by double-clicking VirtualBox in the Applications folder.
- In the left pane, select the virtual machine used by Docker. The machine is named default, unless you have renamed it.
- Click Shared Folders.

- Click
 to add a new folder:
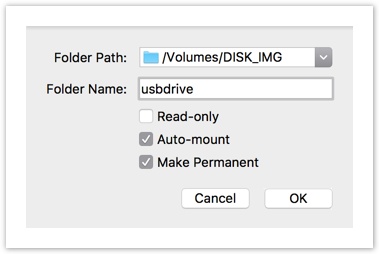
a. In the Folder Path field enter the path to your USB drive.
b. In the Folder Name field enter the name of your shared folder. In this example, we named the folderusbdrive.
c. Check the Auto-mount and Make Permanent options.

- Click OK.
This will add a shared folder and associate it with the OS X mount point of the USB drive.
2. Mount the USB drive Inside the VirtualBox Virtual Machine
- Connect to the default virtual machine through SSH by entering the following command into the terminal:
docker-machine ssh default
The machine that is automatically created by Docker is named default. If you have changed the name, make sure to replace default in the command above.
- Create the
/mnt/usbdirectory which will be used as the mount point for theusbdriveshared folder that you have already created.
sudo mkdir /mnt/usb
- Create an association between the
usbdriveshared folder and the/mnt/usbdirectory:
sudo mount -t vboxsf -o defaults,uid=`id -u docker`,gid=`id -g docker` usbdrive /mnt/usb
In our example, the shared folder is named usbdrive. If you named your shared folder differently, make sure to replace usbdrive in the expression above.
- After the mount command has been executed, verify that the
/mnt/usbdirectory holds the contents of your USB disk:
ls /mnt/usb
A key limitation of the method above is that although the created shared folder persists even after a reboot, while the mount itself that we created in step 2 does not; therefore, this step must be re-executed every time the virtual machine is rebooted. However, the mount can be made permanent by placing the mkdir and mount commands in an appropriately located system bootup script:
- While logged into the virtual machine through SSH, enter the following command:
sudo vi /mnt/sda1/var/lib/boot2docker/bootlocal.sh
This will create a blank bootup script bootlocal.sh.
2. Press the I key to start editing.
3. Enter the following two lines:
mkdir -p /mnt/usb
mount -t vboxsf -o defaults,uid=`id -u docker`,gid=`id -g docker` usbdrive /mnt/usb
- Press Esc on the keyboard.
- Type
:xand press Enter.
The bootup script is now saved. Theusbdriveshared folder will be mounted automatically every time the default virtual machine is started.
3. Mount the USB drive mount point in Docker
- Launch a Docker container, and use the
-vflag to mount the/mnt/usbdirectory from the default virtual machine as/opt/usbin the container:
docker run -i -t -v /mnt/usb:/opt/usb ubuntu /bin/bash
The -v argument is used in the following format: -v <local_path>:<container_path>.
- You can easily verify that the mount has been performed correctly using
ls:
ls /opt/usb
If all steps have been performed correctly, you should be able to see the contents of your USB drive from the Docker container.
Mount the USB drive in a Docker container on a Windows host with Docker for Windows
If you are using Docker for Windows, proceed as follows:
- Right-click the Docker icon
 in system tray and select Settings.
 - Select the Shared Drives tab on the left.
You will now see a list of drives on your computer. - Click the box in the Shared column next to the drive you want to mount in your Docker container.
- If prompted, enter your Windows credentials. You can click the Remember me box and allow Docker to store your credentials for future use.
The account used to authenticate with your Shared Drives needs to be the same as the one used to run docker commands. Otherwise, you will not be able to access the shared drive from your container. Also, for security reasons you will not be able to use an account that doesn't have a defined password.
- Click OK.
Once this procedure has been completed, open Windows PowerShell and enter the following command:
docker run -ti -v d:/:/data ubuntu /bin/bash
The -v argument is used in the following format: -v <local_path>:<container_path>. In this case, make sure to replace d:/ with the actual letter of your USB drive on the local machine.
To verify that the drive has been properly mounted inside the container, enter:
ls /data
You will now see a list of files and directories on your USB drive.
Updated 3 months ago
