Create a tar archive
Overview
Learn how to organize your files and compile them as a tar file. There are two options to tar your files, depending on file organization:
- Option 1: Use the SBG Decompressor tool if your files are in the same folder.
- Option 2: Use Data Studio if you need to reorganize your files before tar-ing.
Once you've created a tar archive, you can pass this as an input to your workflow.
Prerequisites
- The files you wish to tar need to be uploaded to CAVATICA.
- If your files are in the same folder, you must have the SBG Decompressor app as part of your workflow. Add the tool to a workflow and connect it to the tool which will use the unpacked tar archive as input files.
[Option 1] Tar files using SBG Compressor
Follow the procedure below if the files you wish to tar are uploaded to the same folder on the Platform. Note that you must have the SBG Decompresor tool as part of your workflow. Learn more about adding a tool to a workflow.
Conversely, if your files require a specific directory structure or further organization, see [Option 2] Tar files using the Data Studio.
Procedure
- Navigate to the project containing your files and analysis workflow.
- Select the Apps tab.
- Click the SBG Compressor tool.
- Click Run to create a draft task.
- Click the Define App Settings tab.
- From the Output format menu, select tar.
- (Optional) Specify the Output name for the tar archive.
- Switch to the Set Input Data tab.
- Click Select files.
- Select and confirm the files you want to tar.
- Click Run to start the task.
The SBG Compressor will run and tar the files. The tar archive will become available in your project files upon the completion of the task.
Next step
Once you've created a tar archive, you can pass this as an input to your workflow. Learn more about adding inputs to a workflow..
[Option 2] Tar files using Data Studio
Access Data Studio
- Open your project.
- Select the Data Studio tab.
- Click Create new analysis.
- Enter a name for your analysis.
- Click Start to start the analysis.
Data Studio will prepare an instance and open the editor once it is ready. This may take a few minutes.
Organize and tar files
- Once your editor is open, select the Terminal icon and use the workspace to organize and tar files.
- Exit the
workspacedirectory and enter your project directory:
cd ../projects/username/project-name- Copy files from your project to your workspace:
cp * ../../../workspace- Enter the workspace directory again:
cd ../../../workspace- Create the folder structure and organize your files.
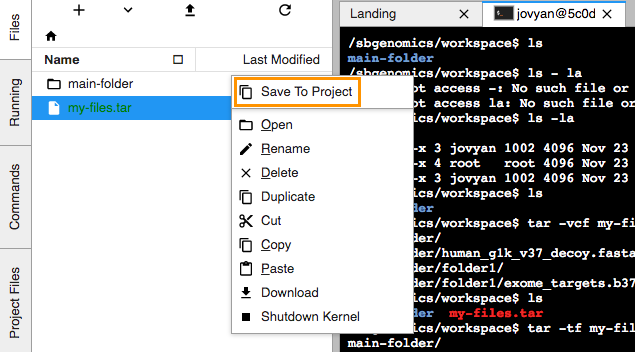
- Tar your files.
tar -cvf my-archive.tar main-folder- Right click on the tar archive and click Save to Project.

- Click Stop Analysis in the upper right hand corner.
Once the analysis has been saved, the tar archive will become available in your project files.
Next step
Once you've created a tar archive, you can pass this as an input to your workflow. Learn more about adding inputs to a workflow..
Updated 3 months ago
